Showing posts with label tutorial. Show all posts

Thursday, November 3, 2011

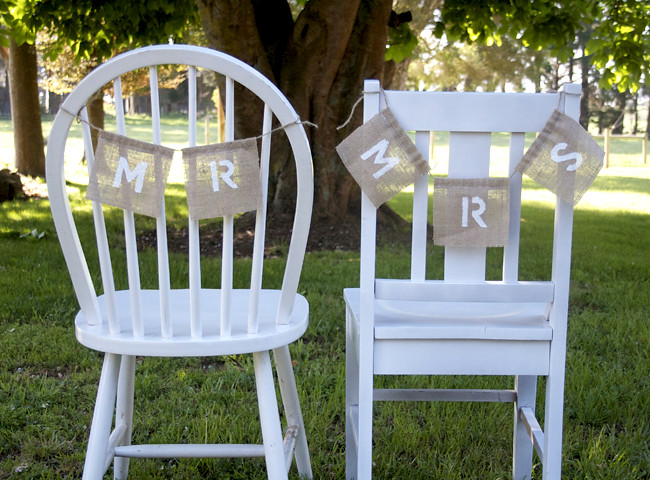
burlap bunting tutorial

Hello there - apologies for the lack of blogging, as you can imagine I have lots going on in the lead up to the big day, not to mention all the things we have to tick off our list before we pack up our house and hit the road. 

If you would like a little dose of Cinderella at Brindabella country style I am a guest blogger over on Polka Dot Made today with an easy tutorial to make some cute wedding decor bunting. Speaking of which I need to go and heed my own advice and make some more...


Head over here if you'd like to make some yourself :)

Image by Emma Durkin for Cinderella at Brindabella

Thursday, July 14, 2011

get your craft on #5: easy peasy baby beanie

Now say that five times with a mouthful of Doritos! Or is that just me? Anyway...I'm back with the latest installment of Get Your Craft On, I know I missed one in June but am hoping to do two in July? At the rate time is flying by I think I might have to do three in August! I know, crazy.


With the babies currently sprouting up in my life (latest edition Pepe and my sister is pregnant at the moment) I thought I'd do a quick tutorial on how to make a little new baby gift. I make these all. the. time. Like literally always have a few floating about on my sewing table. I started making them as 'sales boosters' for when I did markets with Little Miss Emma. Basically my big ticket items were canvas's and minky blankets, but a lot of the time I needed smaller and more affordable items for mums on the run to buy without thinking too hard about the family budget. Plus they cost me next to nothing to make in materials and labour. Winner.


To start you will need the following...

- a baby beanie 
- baking paper to make pattern
- pencil to trace pattern
- scissors (fabric scissors and paper scissors - don't use your nice sewing scissors to cut baking paper!)
- a stretchy-knit fabric like jersey
- pins
- co-ordinating thread in your trusty sewing machine

Originally I got this pattern out of a library book, now unless you are near the Murrindindi Shire Library in Yea (anyone?) I suggest you pick yourself up a little beanie to use as a template. I bought this spotty one in a discount store for $2 to use as an example. Then you can make the pattern and have it forever and make thousands more beanies, all from starting with your $2 one :)

Get some of your baking paper and with your pencil use your beanie as a template to trace around it - add about 3-4cm for seam allowances and about 10cm to the bottom, you'll find out later why. For the top of the beanie I like to do a pixie hat which I will later knot. I think they look super cute and add a bit of a difference to an otherwise plain beanie. As you can see I just freehand drew mine, trying to make it as symmetrical as possibly and rounding the top off. If you like you can precisely measure yours but I'm a freehand kind of sewer/pattern maker! You can always trim down your pattern piece later. 

Cut out the shape, you should end up with a pattern piece like this:


Now using the baking paper pattern you just made pin it to a folded piece of your stretch fabric (so that you get two pieces when cut out). I used a bright pink and watermelon striped jersey but have seen lots of great gender neutral knits in greys, whites and reds around lately perfect for a baby shower gift. 

Once you've pinned your pattern to your folded fabric, cut it out and you should have two beanie pieces (front and back)...


Now you can pin them together all the way around, except for the bottom which will be left open. Off you go. Pin, pin, pin.


Next step is to sew it all together. Start at one end and go up over the long pixie-hat and down the other side. If you're not used to sewing a stretch fabric go slooowly, it can be super frustrating the way the fabric rolls and won't sit flat like a nice simple quilting cotton. I am no stretch fabric sewing expert like my mum (she has a certificate to say she is a 'Knit-Wit'. Yeah. All over that.) 


Once you have trimmed some excess fabric away you might have something resembling this...


Go ahead and turn the hat inside out (or right side out...confused?), iron it all out nice and flat and tie a knot in the long pixie-hat. You'll see now that the cornering at the top point of the hat doesn't matter too much as it is hidden in the knot. No need for perfect sewing? My kind of sewing.

But what about the bottom I hear you ask? Well, like I said earlier when you made the pattern piece, if you left a bit extra then you should be able to fold the bottom up, and then again you should see some nice neat stitching like so...


...and still have a big enough beanie for a newborn. Simply hand stitch two stitches on each side of the hat to secure the fold-up bottom, or if you are an embroidery wizz you could even do some French knots along the fold, and voila! The perfect new baby gift or something to quickly whip up for a baby shower. Once you get going on these beanies I swear they will take you ten minutes tops, and be quite addictive to get rid of some scrap fabric lying about.

Happy sewing!

Images by Emma Durkin for Cinderella at Brindabella

Thursday, May 19, 2011

diy champagne cork shadowbox

Today I am a guest blogger over on Polka Dot Bride with a DIY tutorial on how to savour a special momento from your engagement. 


When I was approached by the lovely Ms Polka Dot to be a contributor for the Aussie wedding blog extraordinaire I may have done a high pitched squeal and a little happy dance (fists clenched above my head, you know what I mean). I will have more posts in the pipeline throughout this year as I prepare for our wedding, hopefully a lot more DIY tutorials for the budget savvy brides. If there is anything in particular you would like to see please let me know!

Head over here to check it all out.

Photo by Emma Durkin for Cinderella at Brindabella
Thursday, May 5, 2011

get your craft on #4: super dooper burpies

Once upon a time I started a little regular series here on my blog called Get Your Craft On. 'Regular' being the choice word there, turns out not so regular! But I promise I'll try and fix that - I am hoping to do a Get Your Craft On feature post once a month, so here goes...

With my sister and two friends all expecting little babies to either start or expand their broods I needed some gifts to throw around. As soon as I heard that the stork was paying a visit, and knowing my friends and sister don't want to find out if it's a boy or a girl, I stocked up on unisex fabrics from some Etsy suppliers I frequent: Sew Deerly LovedCottonholic and Fresh Squeezed Fabrics, as well as my local Kmart to pick up some affordable but super absorbent bath towels in neutral white for a little sewing project.

I like to try and at least give somewhat practical gifts to expectant or new parents, although not being a mother myself I wonder often if I miss the mark?! This time I had some burp cloths in mind, just in case one of these new babes was a 'chucker'. Not just any burp cloth would do though, one which could be easily thrown over mum or dad's shoulder, was ample length so that the dreaded projectile was somewhat caught (sorry to be graphic, but it is what it is) as well as contouring to the parents body to fit in their neck, chest, back and shoulders. 

So, to get started here are my supplies...


1 x white bath towel

Gender neutral fabrics in a fun elephant print, one in green and one in orange.

My trusty sewing machine armed with co-ordinating thread.

Equally as trusty sewing scissors.

A dinner plate to create a template and a pencil to trace outline.

Using the dinner plate as my circle template I traced an almost complete circle onto my fabric, leaving about a quarter of the circle 'open'. Then I measured on myself where I wanted the burp cloth to start and end, from my chest over my shoulder and down my back, about 40cm. I folded my fabric in half and measured a 20cm straight line down to the fold and cut out that shape (see below). I then used my orange fabric as my template for my towel, which I folded also to create a symmetrical shape.


After cutting out the white towel shape I now have my two burp cloth shapes, one in the orange fabric and one in the white towel, I pinned them together with good sides facing and sewed around the edges with about a 2cm seam allowance and a 10cm hole which is going to allow me to turn the burp cloth back the right way.


You should end up with something that looks like this image on the left (below), trim any excess fabric or towel away and turn right side out again through the hole that you left. Your burp cloth will then look a little something like the image on the right - not pretty! Iron it all out to make the shape a bit better.


Iron the hole closed using any remaining fabric left over from your seam allowance to fold under, your hole should look like the image on the top (below). Now to close the hole and make your burp cloth edges a whole lot neater and more professional looking, top stitch around the entire burp cloth starting and finishing at the hole. It should look like the image on the bottom.


Ta da! Your super duper burpie is now complete and should resemble something a little like this when folded in half, with your absorbent toweling on one side and your fun fabric on the other. I then made a second one from the green elephant fabric to make a matching set.


Sorry for terrible quality last photo, I hate winter with it getting super dark super early! :( I hope you've liked this month's installment of Get Your Craft On, and that you might tackle this little project yourself for a new mumma or bubba in your life. If you have any questions please leave a comment.

Happy sewing!

Images by Emma Durkin for Cinderella at Brindabella

Tuesday, December 7, 2010

a very crafty christmas

Doesn't Christmas time make you want to make a million things all at once? Well maybe not, but I seem to go into crafty overdrive once December hits, probably because of all the amazing DIY tutorials floating around in blogland. So this year I decided to do a round-up of my favourites...


Scallop edge felt Christmas trees - I love these, they look super easy to make and I love the fun colours for a bright Christmas table setting. All I need is some scallop scissors...

Baby sock advent calendar - why didn't I think of doing that?! Very cute way to count down to Santa's arrival, who doesn't like mini-socks?

Felt 3D ornaments - also looks really easy to make for a wow-factor to trim your tree.

Lumps of coal gift boxes - these are so fun, I'd love to get a lump of coal with some diamonds inside! How ironic is that? Mr M's family is Dutch and are forever going on about how Sintaklass is coming and Black Peter might give you coal! Love it.

Fabric bird ornament kit - you can buy this whole kit from The Red Thread for only $12 to make these cute tweety birds to zoom around your tree.

And my favourite Christmas craft tutorial would have to be Belinda's book page cone wreath she created over at The Happy Home. Just the right amound of tradition, whimsy and sparkle!

Merry Craftmas everyone.

Tuesday, August 24, 2010

get your craft on #3 - paper butterflies frame


Happy Tuesday lovely readers! The sun is shining in my part of the world, the first time in a long time, my horrible cold is subsiding and all my spring bulbs are poking their little heads of the sodden earth to say hello. Lovely. Why not bring a bit of spring inside with some delicate paper butterflies? Good day for crafting I say. 

You may remember my little bedroom spruce up, and how I was still lacking 'something'. Well - I had a random Ikea ribba frame (don't we all?!) which I thought would look good in our white and neutral bedroom with the help from some aged book pages and a little help.

Here's how it all went down...


With a piece of cardboard to fit your chosen frame, use a compass and pencil to outline some circles where you would like the butterflies to 'flutter'. I did random bits of circles, smaller in the centre and getting bigger so my butterflies would seemingly fly outward. Well that was my plan anyway!


I got an old book from the op shop, I couldn't bear ripping out pages of one of my books, plus this book cost me 20 cents! You will need to be armed with a butterfly craft punch also, remember when I got all punch drunk and happy with my punches? 

Now punch away! You should end up with lots of little butterflies cut out from your books pages. Try and make the positioning of the butterfly punch quite random so the text is not running all the one way.


Fold the butterfly wings upwards to make them three dimensional. I stuck my butterflies down gently with a regular glue stick, running the body of the butterfly along the glue stick whilst it's standing up rather than trying to be fiddly and use the glue stick as a pen to put the glue on. Make sense? ;)


Position your butterflies as you wish, like I said I tried to do a bit of an outward spiral but found that I actually didn't need that many butterflies otherwise it became too crowded and you couldn't really see the spiral shape.


When you're done carefully use an eraser to rub out the pencil marks and pop the cardboard in your frame. Voila! Paper butterflies fluttering next to my bed.


(The photo framed on the other wall is by Tracy Edgar and in a recycled timber frame which was in the cottage when we moved in - love it!)

Thursday, July 22, 2010

{ Get Your Craft On #2 - Fabric Yo yo }

Yo-yo wassup?? Want to make some little fabric rosettes today, also known as fabric yo-yo's?? Welcome to the 2nd installment of Get Your Craft On!

These little fabric beauties are so easy to make and can be used for lots of things - attach them to hair ties, clips or headbands, little girls tshirts or attach to pipecleaners for a fabric posie.


Ok so to begin you will need the following:
- fabric to make your fabric yoyo out of (about 15 cm square)
- a pencil
- needle and thread
- a button to match your fabric
- something round to use as a template, I used a saucer
- hot glue gun


Step 1.
Trace around your round template onto the fabric with your pencil. The size of the circle needs to be double the size you would like your finished yoyo to be. I used a saucer but you can use a jar, a cup or if you want something bigger a plate or bowl. Cut out your fabric circle.


Step 2.
With your needle and thread make a running stitch around the outside of your circle on the wrong side of the fabric, about 1cm inside the outer edge. If you want your yoyo to be quite precise and neat you should go try to go as close to the outer edge as you can, but I wanted mine to be quite shabby with the raw edges showing a little bit. Tip: the tighter you want your ruffles to end up the longer the stitches need to be. Work your way all around the circle and then stitch over your starting point. You should have something that looks like the above picture.


Step 3.
Gently start to pull your thread, holding the fabric in your two fingers as shown. The fabric will start to bunch and gather. Keep pulling and adjusting the fabric as you go.


Step 4.
You may end up with something that looks like the above picture - not a perfect yoyo. You can see it's a bit lopsided, what I like to do is place my finger on the centre and gently wiggle back and forth making the circle even and the 'centre' of the yoyo actually in the centre. You will have to push the fabric around a bit, adjust the tension of the thread until you get a more neat circle with even folds and ruffles of fabric. The back of your yoyo should look like the second picture above.


Step 5.
Ok now you have a fabric yoyo! Dependant on whether you would like a shabby yoyo with raw edges showing (like how I wanted mine) or a more neat yoyo you may want to fold the raw edges under and inside. This is when stitching closer to the edge of the circle earlier will help. Now it's time to get out your hot glue gun and your chosen button (I chose a wooden patterened one to go with my shabby chic yoyo). Carefully glue the button in place in the centre of your yoyo. You can chose a larger button to cover your edges or like I have done used a smallish one so you can still see the raw edges of the fabric.


And voila! You can make lots of fabric yoyos fairly quickly and use up scraps of fabric and odd buttons, in all sorts of different prints, sew them onto little girls tops or use your hot glue gun again to attach to plain hair clips. Have fun!


Thursday, June 3, 2010

{ Get Your Craft On #1 - Beach Blocks }

One of my new years resolutions was to learn lots of new crafty skills, try and hand make a lot more kids presents rather than buy plastic crap for them and do a lot more crafty things on the Little Miss Emma blog - so here goes the first installment of a new regular series: Get Your Craft On!

Preparations for our upcoming trip to Papua New Guinea are in full swing this week here at Ythanbrae. Mr M is organising cattle and making sure the farm will keep ticking in our absence and I'm organising flights (still!!), travel insurance, thinking about whether I need to pack two pairs of bathers and generally dreaming of a warmer climate (in between caring for a sick little Monty, poor possum). As well as all these things I have been dreaming up little presents I can bring to LucyLu and Little Miss Sunshine - our friends gorgeous girls in PNG. Now I know my friend may be reading this so the surprise element has been lost but that's ok! I wanted to post this before we left and there are plenty more pressies stuffed in my suitcase :) 

So - you wanna make something that ends up looking like this??


I started with some raw MDF wooden blocks I purchased awhile ago on Etsy from Melanie A Stewart's store If Walls Could Talk. They are 1 x 1 inch, a bit smaller than I anticipated so probably not best for babies. Last week I was rummaging in the Yea op shop and found some vintage Golden Books and thought I could cut them up and put them to good use with a new lease of life. You can find some great Golden Books on ebay in bulk lots also. I decided to use 'Beach Day' as LucyLu and Little Miss Sunshine I'm sure are missing the Aussie beach they used to frequent (they now live inland in PNG).


I first cut up 1 x 1 inch squares from the pages of the book using my guillotine - I would suggest cutting just 1mm smaller than you need as I had to fold over some edges and glue down. You can be totally random in your squares or pick out sections you would like to display. I tried to pick out some little details like seagulls, faces, seashells, water splashing, palm trees and sailboats. I also cut up the text to display certain words like 'mermaid', 'waves', 'mama', 'daddy', 'beach', 'sand' and generally any adjectives or verbs. 


Using a good quality craft PVA glue and a small flat brush I painted the blocks with glue and stuck on the little squares of cut up pages. It was actually quite methodical and rhythmic, I did it sitting in front of the TV on the floor at the coffee table, trying to get Tessa to not stick her little wet puppy nose in craft glue.


After all the sides were covered I mixed up a decoupage mix of 3 parts glue to one part water and gave each block several coats. This makes the paper not so paper-like, it hardens and gives a nice gloss the more coats you give. I then sprayed them with a fixative that I just happened to have but you can skip that part if you like.


Using a cut-off piece of fabric I had floating about I made a very simple, two seam bag (great project for beginner sewer) and used a piece of white grosgrain ribbon to create a drawstring. If you would like a tutorial on how to sew a drawstring bag I found a great one here over at bunnybum (great blog I've now discovered too!)


Pop the finished blocks inside and you've got a very simple, quick, affordable gift to give to a lucky little person! I definitely want to make some more, probably bigger ones, using scrapbooking papers. You can print numbers and letters out and stick them on, or make a puzzle with some strategic cutting of papers for older children to put together. The possibilities are endless!


I hope you liked the first installment of Get Your Craft On - if you have any suggestions as to some other craft projects I could feature don't be shy :) I'm off to finish some other pressies and some of those jobs-to-do-before-you-go-on-holidays.

Have a lovely day xx


LinkWithin

Related Posts with Thumbnails